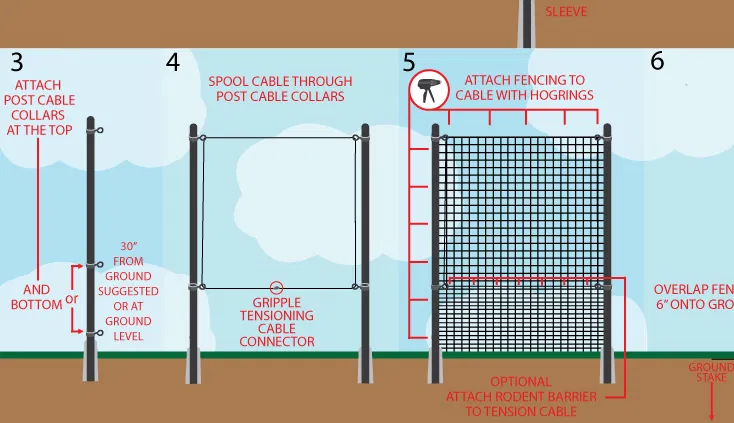
The purpose of this page is to identify the parts needed to add tensioning to a fence you already have or just purchased (but didn't order tensioning with)
Tensioning consists of 3 parts:
1) tension cable (12ga black braided steel cable or 8ga black monofilament tension cable)
2) post cable collars - there are two different sizes 1 5/8 and 2 1/2
3) Gripple brand tensioning connectors - 12ga medium or 8ga large
Step one:
Identify the number of line posts in your fence kit(s). They are in increments of 7 - so a 100 foot fence kit usually has 7 posts, a 150ft fence kit 14 posts and a 300ft fence kit typically has 21 posts. You need two 1 5/8 collars for every one of these posts.
Identify the number of access gates you have that are 7 feet wide or less. You need four 1 5/8 collars for every one of these gates.
Here's the direct link to 1 5/8 post cable collars on our website:
1 5/8 post collars (critterfence.com)
Step two:
Identify the number of corner posts, end posts in your fence kit(s). These can be in any quantity and are listed as 2.5 inch posts. You need two 2 1/2 collars for every one of these posts.
Identify the number of driveway gates you have that are 8 feet wide or wider. You need four 2 1/2 collars for every one of these gates.
Here's the direct link to 2 1/2 post cable collars on our website:
2 1/2 post collars (critterfence.com)
Step three:
Add the correct linear footage of tension cable and type to your shopping cart. 12ga black PVC coated braided steel cable is typically used for everything. The exception is fences that are a combination of fence posts and trees or all trees, that's where 8ga monofilament is typically used because monofilament can flex or stretch with some movement.
General guide to the amount of cable needed:
250 linear feet of cable for every 100 feet of fence
The reason for this is tension cable is installed in a loop format making a complete circle and meeting back where the cable started again in a series or blocks of fence posts or trees.
Here's a basic example of how the loop format tensioning system works:

Here is the direct link to order 12ga black braided steel spools of cable:
Black PVC steel 12ga 250 feet (critterfence.com)
Here is the direct link to order 8ga black monofilament spools of cable:
8ga 1200lb strength monofilament cable 250' spool (critterfence.com)
Step four:
Add the respective number and type of Gripple tensioning connectors
In general, as a guide, for every 2 posts (or trees) add one Gripple.
So if you have a 7 post fence kit, add 4 Gripples (round up). If you have a 21 post fence kit, add 11 Gripples. In addition, you need to add one Gripple for every gate you have because the tensioning run will stop, then start again on the other side of the gate.
Here is the direct link to order 12ga medium Gripples:
12ga Gripple Plus Medium 1pk (critterfence.com)
Here is the direct link to order 8ga large Gripples (for 8ga monofilament cable):
8ga Gripple Plus Large 1pk (critterfence.com)
note: large 8ga Gripples are more expensive but work on both the 12ga steel cable and also the 8ga monofilament cable
Add on accessories:
Hogringer hand tool with rings. This tool works like a stapler, only makes circles of steel called hogrings. These hogrings are used to attach fence to fence (like a 2x2 layer of fence paired with a 1x1 bottom layer of fence) or to attach fence to tension cable.
There are two types of tools - the 9/16 contractor tool or the 11/16 basic tool.
Here's the difference between them and a direct link to add one to the cart if needed:
The 9/16 ringer is the most popular, most expensive and the fastest tool to use. It's also a bit finicky and can misfire.
Here is the direct link to order a 9/16 ringer:
Hogringer crimping hand tool 9/16 (critterfence.com)
And the 9/16 rings for the tool:
Hogrings for hogringer hand tool 9/16 black galvanized box of 2500 (critterfence.com)
The 11/16 ringer is the most popular for smaller kits (200 feet or less) or short fence kits 7ft 6ft 5ft 4ft. The reason is the tool is slower and has a side action (as opposed to the 9/16 ringer that is operated like a hand gun and the rings come out of the tip or nose of the tool). This tool is easier to use and misfires less. The tool itself comes bundled with 500 rings.
Hogringer 11/16 Bundle With 500 Black Hogrings (critterfence.com)
And additional boxes of 2500 rings for the 11/16 tool:
Hogrings 11/16 box of 2500 black galvanized (critterfence.com)
In general you can estimate 500 rings or less for every 100 linear feet of fence. If you don't use a hogringer tool with hogrings, you would use multitudes of fence ties (included with your kit) for attachment. This method is preferred for any customer that wants to make their fence kit removable; hogrings are much more permanent.
Torq tensioning tool
This tool is made by the same company that makes Gripples. It's used to tighten either 12ga or 8ga cable tighter than can be done by hand.
Here's the direct link to order a Torq tensioning tool:
Gripple Plus Torq Tensioning Tool (critterfence.com)
Typically the tool is recommended for large fences (more than 300 linear feet) or fences that use monofilament tension cable on trees. Since monofilament stretches, it's harder to tighten than 12ga black braided steel cable. Most customers don't use the tool and instead tighten with two people by hand (one pulling on one end of the cable, the other pulling on the other).


